OpenAPI in Confluence
Paste an OpenAPI or Swagger description into a Confluence page, and the app draws a map of its endpoints and schemas. Readers see the whole API at a glance, and open the details they need.
- It reads OpenAPI 3.0 and 3.1, and Swagger 2.0, in YAML or JSON.
- Nothing is fetched and nothing is called: the app only reads the text you paste.
- Drawing Mermaid or PlantUML instead? See Get started or PlantUML in Confluence.
Before you start
OpenAPI is part of Mermaid & PlantUML Diagrams for Confluence, our diagrams app for Confluence Cloud. The app adds three items to Confluence's editor: Mermaid Diagram, PlantUML Diagram and OpenAPI Diagram. They are one app, with one installation and one license.
Confluence calls an item like this a macro. You will see the word in some of Confluence's own messages.
You need the description as text: the openapi.yaml or
swagger.json file your team keeps, or what your API
tool exports. Open it in any text editor and copy all of it.
If OpenAPI Diagram is not in the list in step 2 below, the app is not installed on your site, or not at version 2.11.0 or later, the version that adds OpenAPI. Ask a Confluence admin to add or update it (see For Confluence admins).
Add an OpenAPI diagram
- Open the page and select Edit at the top.
-
On an empty line, type
/openapiand select OpenAPI Diagram. You can also select + (Insert elements) in the toolbar and search forOpenAPIthere. -
The diagram editor opens by itself. Paste your description into
Diagram source, replacing anything there. To try
it first, select an example under Examples:
Pet store, OpenAPI 3.1, Swagger 2.0, JSON or Minimal.
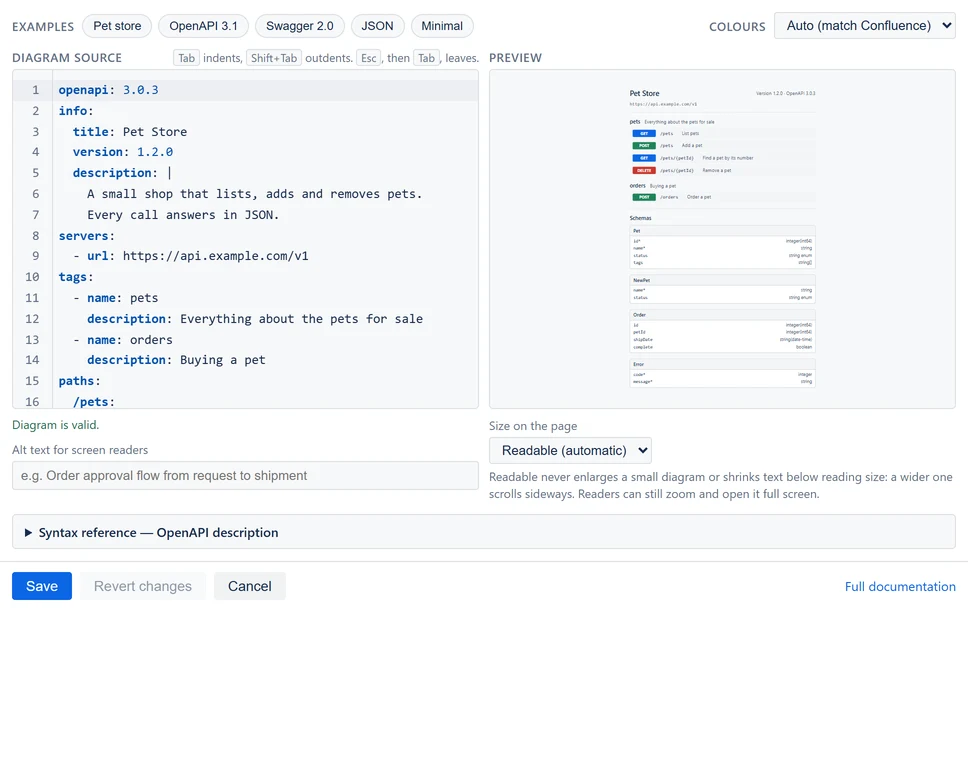
The Pet store example. The description is on the left, the map on the right. - Check the line under the text. "Diagram is valid." means the description was read. Anything else names the problem and, where it can, the line it is on. See When it does not draw.
- Optional: in Alt text for screen readers, say in one sentence what the API is for, such as "The Pet Store API: listing, adding and ordering pets." Screen readers read it out in place of the map. See Describe it for screen readers.
- Select Save, then Publish the page (or Update, if it was published before).
Change a diagram later
- Edit the page.
- Select the diagram. Clicking inside it does not select it. Instead, point at the diagram's edge. When a gray frame and the label OpenAPI Diagram appear, select the label. Or click at the end of the line above the diagram and press the down arrow key.
- Select Edit, the pencil in the small toolbar under the diagram.
When your API changes, paste the new description over the old one and save. The map follows.
Where your description goes
Nowhere outside Confluence. The description is saved in the macro on the page, like any other content, and drawn in the reader's browser. Nothing is sent to us or to anyone else, server addresses in it are shown as text only, and the app asks for no new permission. See Data and security.